
I haven't done many tutorials - in fact, I don't think I've ever done one - and I mostly make things out of curiosity only once to try to fiure out how it works and if I can do it and then I let it go and don't care to make it again, but this baby blanket is a keeper and because it is so easy, so cheap and so super cute, I'm going to try my best to spread the word. This idea by the way is not an original of mine (I wish) rather I saw this blanket on a cute little boy named David, whose auntie made him one. I think her name is Molly - credit where credit is due.
This project takes a day flat or two afternoons, take your pick, it requires virtually no knowledge of anything crafty (yes, even my dear friend, Heather - if held at gun point - could make this) and done in pairs or even a set of three, this could be a perfect group-gathering shower gift to make for a new Momma in need of many cuddly, warm swaddle blankets. Seriously, if a half dozen women get together they can crank this blanket and a few more out in a single sitting, while chatting and drinking wine.
Here is what you need:
- 1 yard of a cute cotton print
- 1 yeard of coordinating flannel
- 6 yards of embroidery silk (or floss, if that's what you must call it)
- 1 packet of pins
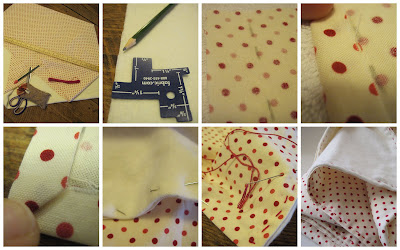
- 1 ruler the longer the better (better yet a cutting mat but not neccessary)
- 1 sharp pair of scissors
- 1 embroidery needle
- 1 pencil
- 1 iron and board
- Optional: Fabric glue or fusing band
TOTAL COST (rough estimate) $20
Here is what you do:
1. Buy, gather all the materials
2. Prewash the 2 yards of fabric, together on a cold setting with a baby-friendly detergent
3. Dry them and iron them
4. Cut the two pieces of fabric into two perfect squares of 36 inches each side (this is trickier than it sounds, work slowly, measure twice before cutting, make sure you have 90 degree angles and control by folding it into triangles to make sure they are perfect squares, also - duh - make sure both pieces are EXACTLY the same size)
5. Take measuring stick and measure 1 inch and mark all around on each piece on the WRONG side
6. Fold edges to the 1 inch mark all around and iron the folds, voila 1/2 inch seam allowance!
7. Make hospital bed corners. Unfold the corners and fold the upper fold into a triangle in. Iron down. Make sure no rough edges show to the outside (see pictures)
8. Spray of lay a bit of fusing under the ironed down edges to hold in place. Iron down. I don't do this because it makes the edges a bit stiff, but if you feel handicapped this is perfectly fine to do.
9. Pin the two pieces together, the ironed down (and glued or fused down) edges facing each other.
10. Cut 1 1/2 yard of embroidery silk (floss) divide the strand into two (there will be three individual little strands in each strand you create) this is a bit tricky to do but with some patience and a lot of fussing and untwirling you'll be fine.
11. Thread one strand into embroidery needle and make a knot in one end, insert the needle in one corner BETWEEN the two layers (to hide the knot) and make your first neat litle stitch about a 1/4 inch from the edge. I call this a mattress stitch a simple through both fabrics out one side, back to the other side sort of stitch. You could do different ones if you wanted but I'm finding the simpler the cuter and the more fun for everyone. These stitches don't have to be super straight or uniform (that would be boring and store-bought looking) but they have to be fairly snug and you have to make sure that you grab all four layers of fabric in each stitch.
12. Make stitches all the way to the next corner, darn in the remaining silk (that's two tiny stitches in between the layers that can't be easily seen, snip off the remainder silk and start anew (or let another friend take a turn, ideally two or even three people should be able to work on the same blanket if it is laid out on a table.
Voila! A super cute, super soft, super cuddly baby blanket.


